Rebuilding a 1986 Yamaha TT225, My First Dirt Bike

I grew up in the country with the distant sounds of two-stroke engines. Although many of the kids at school grew up riding their family dirt bikes, I never had the opportunity to ride one when I was younger.

Fast forward, I was twenty six years old and I went out on a limb to figure out how to get my motorcycle license. I loved my new hobby of riding motorcycles, and yet all my experience was with heavy, street focused motorcycles on the pavement and maybe occasionally on gravel roads. The idea of riding more off-road sparked my interest in learning how to ride a much lighter vehicle and being able to live out my childhood dream of owning my own dirt bike.
For months I searched for used dirt bikes online, hoping for a reasonable deal on a 200-300cc vintage bike that I would be able to work on and maintain myself. One day, I received a phone call from my father-in-law who was at a cottage up north. He was currently at a garbage dump site and mixed in between the debris was an old dirt bike that had been thrown out. Just one photo of this neglected, incomplete Yamaha had me hooked. This was it!
The Tear Down
There was a big difference between my expectations and reality. I was ambitious and I figured I could get it up and running in no time. I would be off to the races! Then reality set in and I understood that this old 1986 Yamaha TT225 would need a lot of love. What I didn’t know at first glance was how many parts were simply omitted from the bike. Parts like: the full carburetor assembly, half the air box, main dash components and even the seat were absent. Other essentials like the front fender and gas tank were also beyond repair.


This bike had been neglected and sitting outdoors for the better part of two decades. So, after a very thorough pressure washing I ordered a few new pieces to start off the project on the right foot. A new front fender, fork boots and handle grips were the first to be replaced. It helped to have a few easy wins towards the beginning of the project to fuel my motivation.


Next, I began taking each and every piece of the bike apart one at a time. I took a substantial number of reference photos along the way as I catalogued and labeled every nut and bolt. Having some not-so-subtle obsessive qualities, I spent a great deal of time on each step giving it the attention it required. Some components, such as the rims, just benefitted from a good clean and polish, while other pieces needed to be either sanded or hand-filed down to the correct shape and then repainted to return back to their original state. I kept this process going, disassembling every part and sanding them all down to have a clean finish once again.
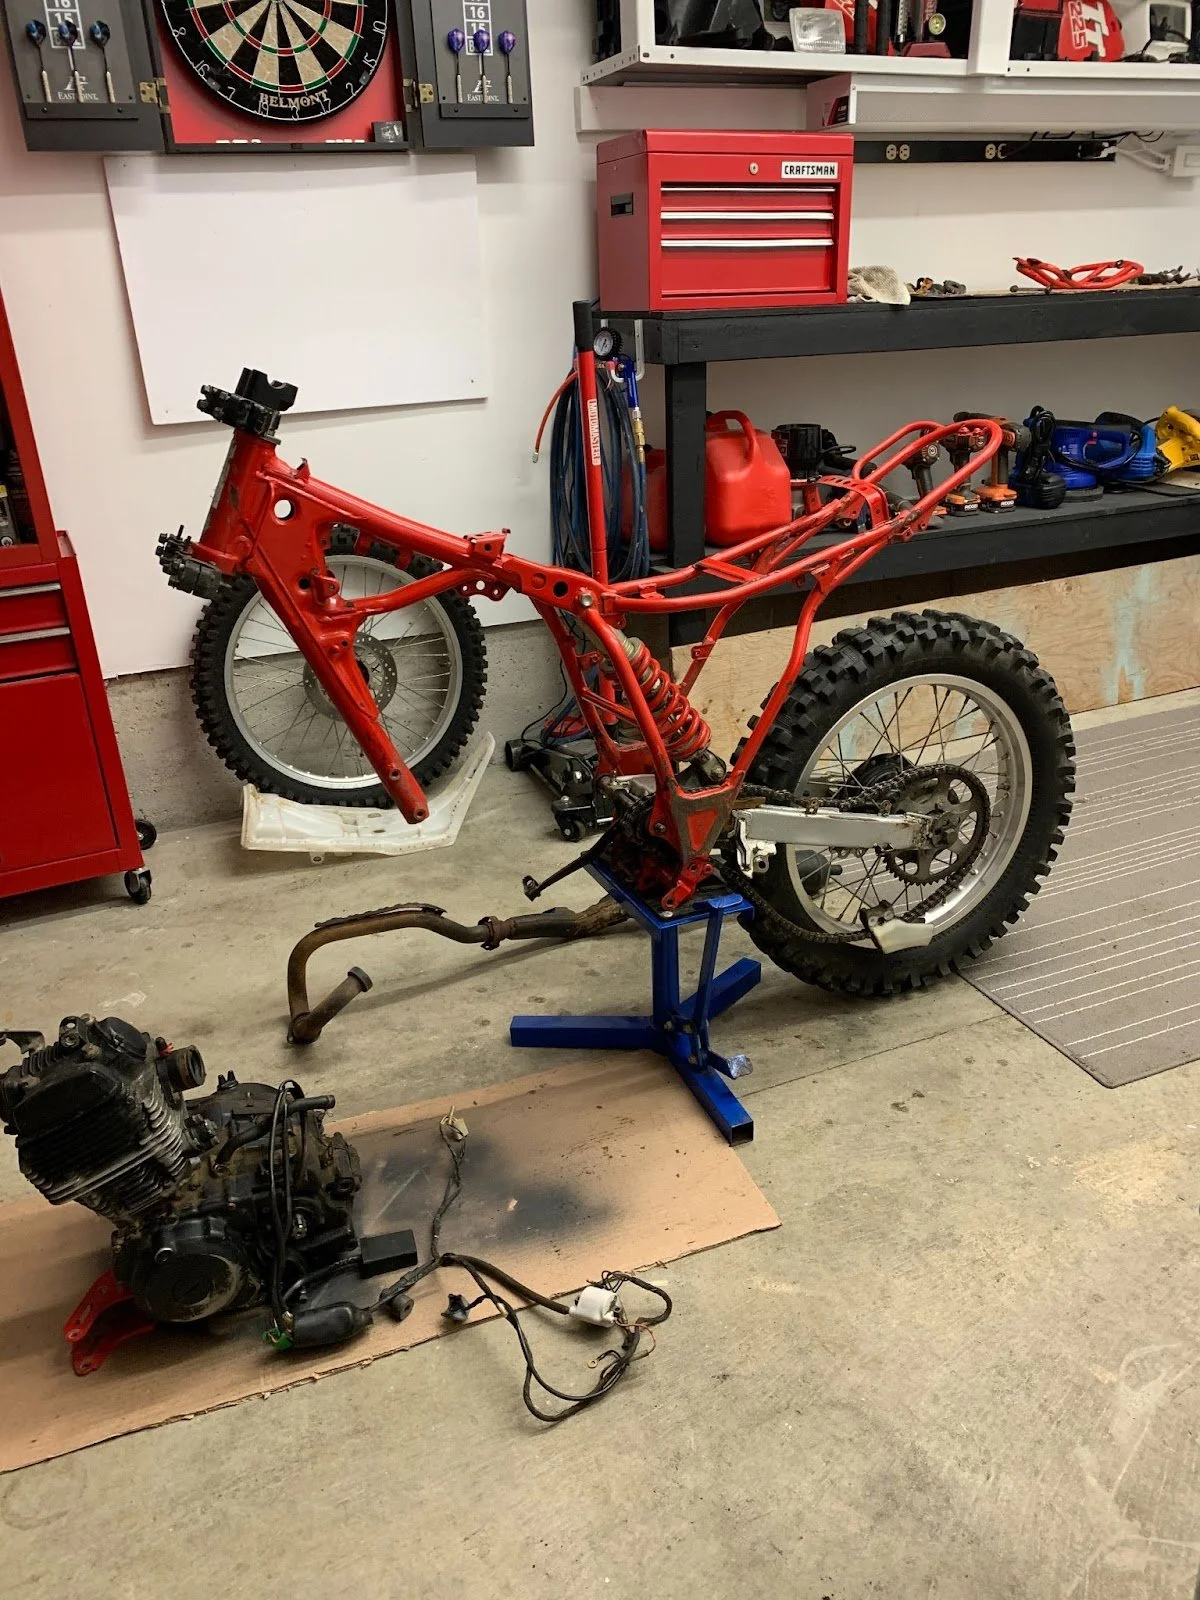

Initially, I told myself that I would keep removing pieces until I felt like I was getting in over-my-head and then at that point I would mask off the remaining sections and paint the red frame. To my surprise, I never reached the point of feeling overwhelmed with the disassembly, and I managed to disconnect and remove every part off the frame so that I was ready to move on to the painting stage with nothing in the way.
Time for Paint
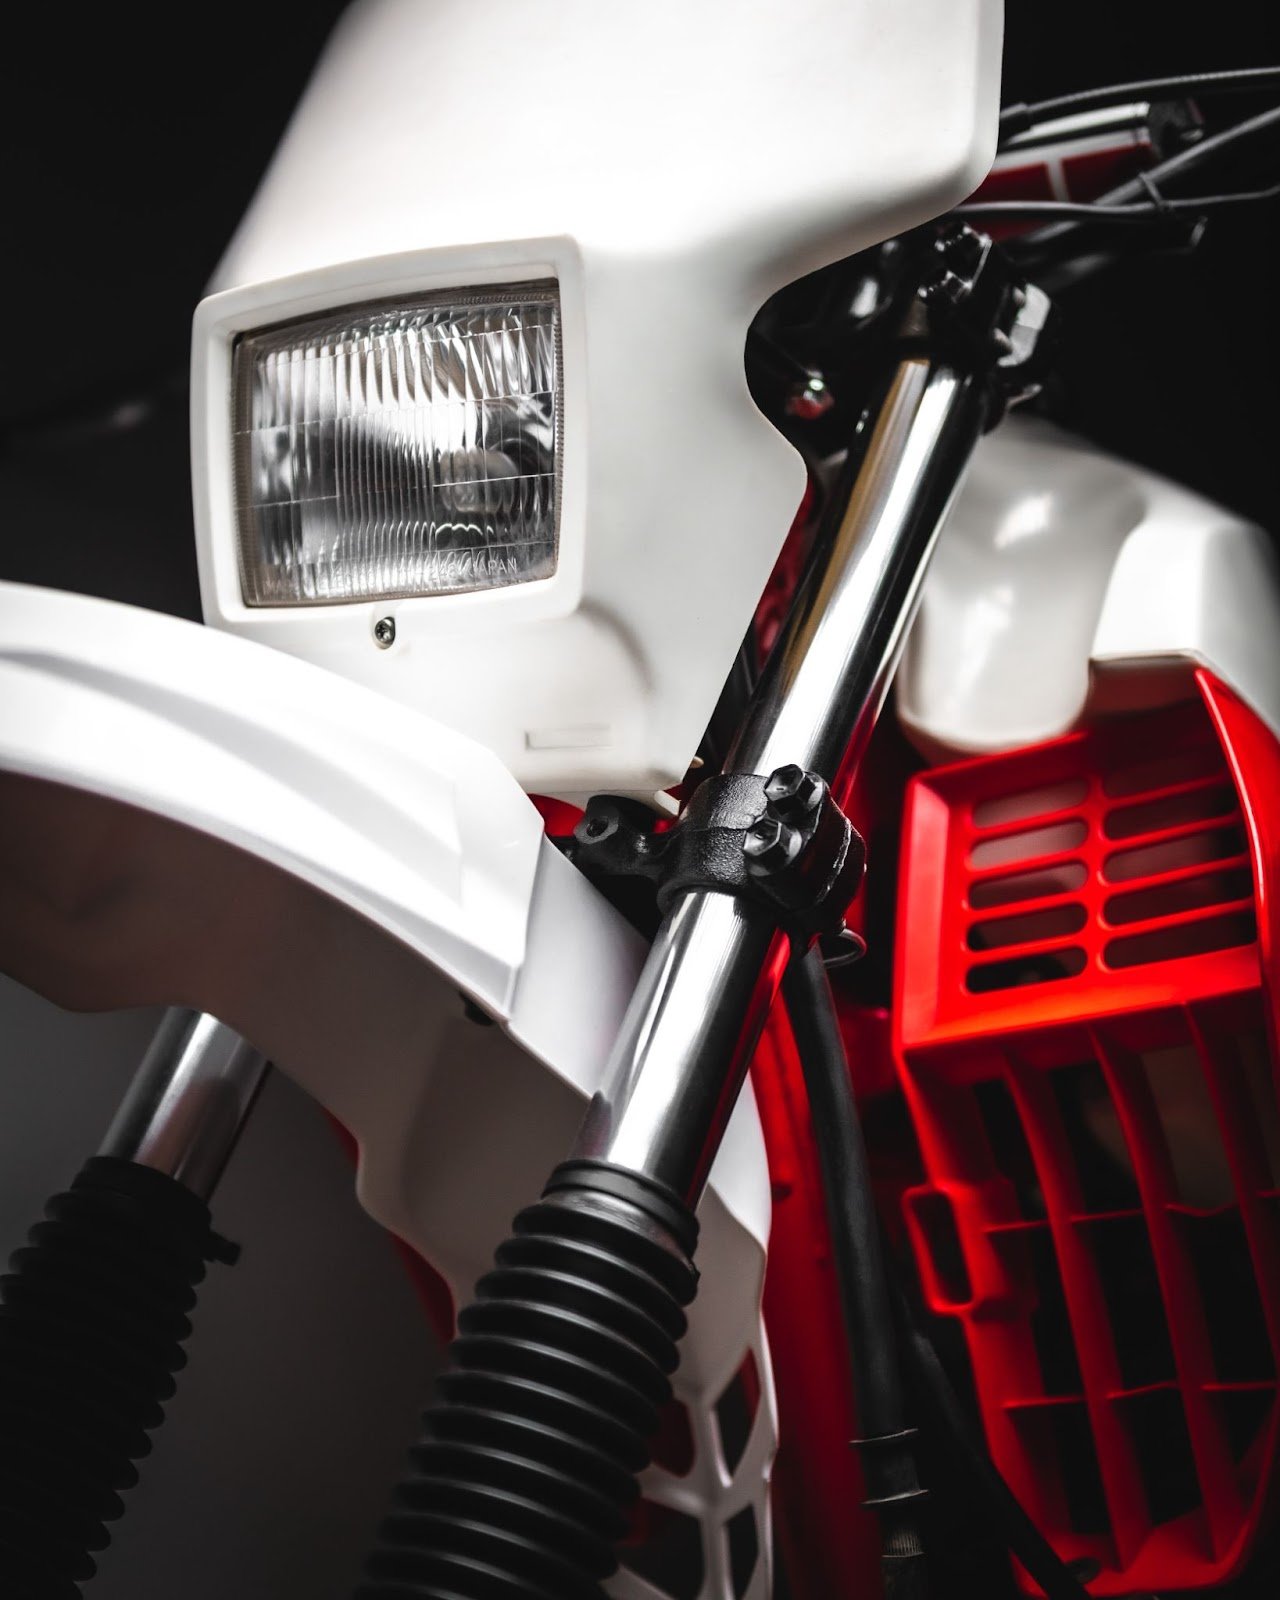
At this point in the project, I was ready to repaint all of the larger pieces that made up the dirt bike including the main frame, the swing arm, handlebars, exhaust and many others. I chose to go with spray cans for everything due to their convenience and because it was possible to achieve consistent results if I took the time beforehand to prep the metal properly beforehand.


I kept quite close to the original colour scheme with the OEM Yamaha red matching almost perfectly to the standard Rust-Oleum “Apple Red” spray paint colour. For any parts that were originally painted silver, I went with Rust-Oleum’s metallic “Flat Antique Nickel” paint which I’ve had great results with in the past. The only area in which I ventured away from the OEM colour scheme was the engine. This Yamaha TT225 originally came with a semi-gloss black engine, but after much debate I went with a fully matte black high-temperature paint instead. Maybe it’s because I love the look of matte black, but either way it’s easier to touch up down the road.
The Reassembly
As the saying goes, “Anyone can take something apart, the difficulty comes when you need to put it back together again.” I had this in my mind as I began to reassemble all of the freshly painted and polished pieces. The original bike shop manual proved to be a key resource. I read each section of the manual, applied the necessary grease in the bearings, and followed the torque specs as I began putting the dirt bike back together. One invaluable piece of information was my in-depth list of every part I disassembled in order. All I had to do was work through the list in reverse from bottom to top and, in theory, the bike would be reassembled once again! I told you about my optimism.


Luckily, I did not have too many roadblocks assembling the bike back together again save for a few hiccups such as ordering a new chain that was too short, and fighting the exhaust for an hour or two during install. The short story is that the exhaust originally came as two halves which were now rusted solid together. So, it required taking the engine and rear shock back off the bike a second time to allow the exhaust to fit through the frame correctly. A few missing circa clips later and I had a bike reassembled to the point of looking somewhat presentable. At this stage in the project the TT225 had the appearance of a trials bike with many of the parts still being absent.
Missing Parts and First Starts
From the beginning of this project, I was adamant in recording every penny that went into the bike rebuild so that I could be aware of my budget. Up until this point, the costs were quite minimal and I was very optimistic that I would come in under my budget of $500 all in. The dirt bike was now around 80% complete, but I was about to find out why it was left at the dump.


Yamaha has always had a legendary history and lineup of both two-stroke and four-stroke dirt bikes. I had this in the back of my mind when I first saw this bike at the dump, thinking that parts would be easy to find. It wasn’t until much later after I did some more research that I realized Yamaha had only made the TT225 dirt bike for two years, from 1986-1987, before moving on to other, more popular models. The previous owner of this bike along with everyone else rebuilding a TT225 are desperate to find two essential parts, an OEM carb and a stock gas tank.

I had gotten this far into the rebuild without considering that the carb for this bike model is almost non-existent. My first attempt at a solution was to buy a new third-party Mikuni carb and try to adapt it to run on this model. However, after receiving the part and playing around with it for longer than I would like to admit I couldn’t figure out how to make it work for my unique situation. It was an incredible coincidence, but as I was returning the third-party carb online, I spotted one OEM carb for sale on eBay that had just been newly listed. It was the only one available. I didn’t hesitate for a second. I couldn’t believe it when the carburetor arrived a week later. Not only was it off of an identical 1986 TT225 bike, but it was in amazing condition, even having the original hoses and clips intact. Now I was really getting somewhere!
Half of the air box assembly was with the dirt bike when I first acquired it, but many of the pieces were missing. Similar to the carburetor, I was able to eventually find all of the OEM parts needed through eBay to put together one fully assembled air box. The only exception was the rubber connector between the carb and the engine which I purchased new for a TW200 and cut down to fit.
I was able to find a great deal on a TT225 seat because a mouse had eaten most of the material and foam by the looks of the photos online. This wasn’t a problem for me because I was only purchasing it for the seat pan anyway. Once I cleaned up the seat pan, I ordered a new seat cover through Amazon and sent off the pieces to my local upholstery company, Archbold’s Custom Shoppe. They custom maked a new foam seat to fit based off of my reference photos. As soon as all of the important parts that were missing had been installed, I was finally ready to try and start the bike for the first time in 15+ years.
I’m sure we could all see this coming, but like any good success story the old dirt bike definitely did not start up on the first kick, or even the 30th. Then came the arduous process of taking the carb on and off the bike many times as I kept making small tweaks to the jets and settings. After making adjustments for a couple nights, just when I was starting to feel fully discouraged, wouldn’t you know it, the old 35+ year old dirt bike finally roared to life! Honestly, I was as surprised as anyone given that I am in no way a mechanic, and just a week or so before this point, the dirt bike had been in hundreds of small pieces in my basement. I was so excited to have my own dirt bike running for the very first time. Even though it sounded terrible and it was idling like an over-caffeinated rabbit mid-sprint, I couldn’t have felt more accomplished. We were nearing the finish line now.
The Finishing Touches


With the engine now running, there was just one huge issue I’d been avoiding and needed to solve. Although my dirt bike came with its OEM gas tank, years of old gas and UV light from the sun beating down on it had taken its toll on the plastic tank. At first glance, the tank appeared to be in great condition, but after a few temperature changes in my garage, the old, brittle, plastic tank started to crack and split in all directions. It was falling to pieces before my eyes. Finding a used stock tank would be next to impossible because the age of the plastic caused the tanks to become too fragile. After many nights of research, I landed on the best solution. I decided to buy a new Clarke Racing stock tank for my bike’s older brother, the TT350, and retrofit it to work with my smaller model. Once I ordered and received the brand new tank from Clarke, I began making plans for some custom metal brackets to align with the new mounts required for this slightly different tank. Initially, I was planning on making all the changes reversible, but in the end, the only way to have a TT350 tank fit a TT225 bike was to cut the metal mounts off of my frame and weld a custom bracket to bolt it onto the frame in the new location. It took a good amount of time and effort, but eventually the new tank was mounted to the TT225 frame. The red gas tank side covers are mounted differently on the TT350’s, so I also created additional metal brackets to align with the TT350 tank bolts.


Originally, the 1986 TT225s came with a simple trip meter that was mounted between the front headlight and handlebars. This piece of the bike would track how many miles you had traveled since it had last been reset and was incredibly basic. So, since my trip meter had gone missing, I opted to replace the original part with another custom fabricated metal bracket. This new metal piece housed a RAM Mount Quick-Grip phone holder instead. This phone holder is the most secure option for any open cockpit scenario so I wouldn’t have to worry about losing my phone on the trails. This mount would allow me to have easy access to everything from trail maps to music at my fingertips. While I was still riding the high of adding modern upgrades to my vintage dirt bike, I also switched out the child-sized foot pegs for a new set of pegs off of a KTM 890 Adventure Rally. The pegs colour scheme was an exact match to my swing arm paint which was a nice bonus.


Last but not least, I created new digital files for the retro TT225 tank decals on the computer and sent them off to a printer I found via Etsy. When the decals arrived in the mail, they were quickly installed along with a new retro-inspired Yamaha bar pad which I also came across on Etsy and something that I could not resist adding to the final build.
Final Thoughts
After a few months of spending my evenings working away in the cold garage, I had finally come to the end of my to-do list for the project. All that was left was to shoot some final photos of the completed bike (I am a photographer after all), and start to look forward to new adventures with my very first dirt bike in the spring. And that brings us to now, as I finish writing about my experience and work over the past few months, I can’t help but get excited every time I open the garage door and see my childhood dream come to life in the form of my brand new, 1986 Yamaha dirt bike.